


Mystere Curio Kit
Part 2: Texture & Painting
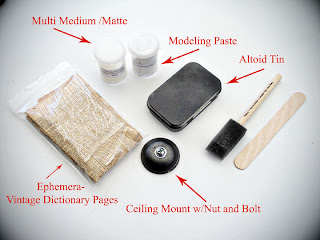
Gather the following supplies from your kit or studio:
- Completed Mystere Vessel ( see Part 1)
-Foam Brush
-Popsicle Stick
-Modeling Paste
-Multi Medium/ Matte
-Black Acrylic Paint
-Copper Acrylic Paint

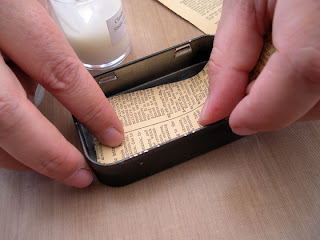
We will begin with adding modeling paste to your vessel.
Think of it like frosting a cake. The goal is to disguise the
tin and ceiling mount.
Make the vessel appear more organic with added interest.
We will also try to hide the hinge flap holes on the side of
your tin.

The thicker the layer the longer you will need to let it dry.

Optional: Some people have great success stamping into the
modeling paste after it starts to set up.

As you work start with a light cover and then if you so desire build it
up.
Once
it has fully dried. You will need to find a sanding tool.
Sanding sponge or emery board will work perfectly.
Lightly
sand the modeling paste removing any unwanted points and areas.


After
sanding wipe your piece off with a slightly damp
cloth
to remove the dust created from sanding.
Then be sure to clear the hole in the back.

It’s
time to paint your piece.
Start
with a base coat of black acrylic paint.
We
want to cover the entire outside of the tin and base.


Once
your base coat is dry we will introduce a second color.
We prefer Turquoise. With painting
remember you can always add more.
But you can’t always take away.
But you can’t always take away.
What
we want to do with these next layers
of paint is use a dry brush technique.
Use a brush with a "light hand" and almost nothing on it.
When we say “light hand,” we mean don’t insert a lot
of pressure when first making contact with the surface.
We want to just gently hit the high points on your tin.
We want to catch all that great texture
we made with the modeling paste.


You will repeat this process with a secondary color.
Be sure to give dry time to each layer of color, so as not to blend.

We like to use a
metallic color for the next layer.
In our sample we used copper acrylic paint.


In our sample we used copper acrylic paint.


You will now use the
same dry brush technique on your other elements.
In our kit it will be
the ornate chipboard corner
from Leaky Shed Studio and your black resin
oval frame.


Now it’s time to let it
all dry.
Part 3 coming soon.
Part 3 coming soon.
Have a great Monday everyone!
- Jack & Cat Curio
</
- Jack & Cat Curio
</


